AB 07 — VLAN (vertieft)
Nach der praktischen Einführung in AB 06 vertiefen wir die VLAN-Konzepte: Trunking-Protokolle, VTP, Inter-VLAN-Routing mit Router-on-a-Stick und Best Practices für Produktivumgebungen.
Erkläre den Begriff VLAN
VLAN steht für Virtual LAN.
Wozu dienen VLANs?
Ein VLAN trennt physische Netze in logische Teilnetze auf. Datenpakete eines VLANS werden nicht in ein anderes VLAN weitergeleitet, obwohl die Teilnetze an einem gemeinsamen Switch angeschlossen sein können.
Nenne 4 Vorteile beim Einsatz von VLANs.
Verkleinern von Broadcast-Domänen, damit sich Broadcasts nicht über das gesamte Netz ausbreiten.
Sicherheitsaspekte. Es kann z.B. ein Management VLAN angelegt werden um die Switches zu konfigurieren.
Einsparung von Hardware.
Ermöglicht logische Gruppierung von Geräten, die physisch über ein Netzwerk verstreut sind.
Woran erkennt man in den Spezifikationen eines Switchs, ob er VLAN fähig ist, oder nicht?
Falls er den Netzstandard IEEE 802.1q unterstützt.
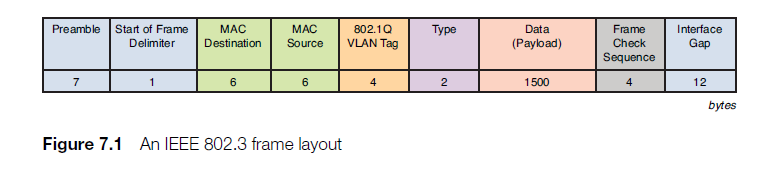
Auf welcher OSI-Schicht wird die VLAN-Information eingeführt?
Schicht 2:
Erkläre den Begriff VLAN-ID.
Die VLAN-ID bezeichnet die Nummer des VLANS (1 - 4096)
Erkläre den Begriff Access Port.
Mit portbasierten VLANs (untagged interface) unterteilen Sie einen einzelnen physischen Switch einfach auf mehrere logische Switches.
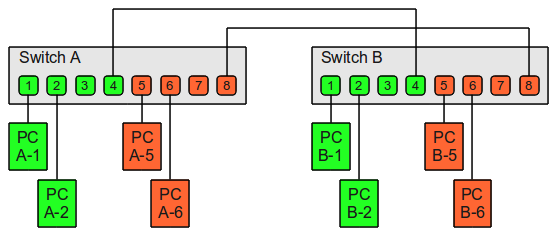
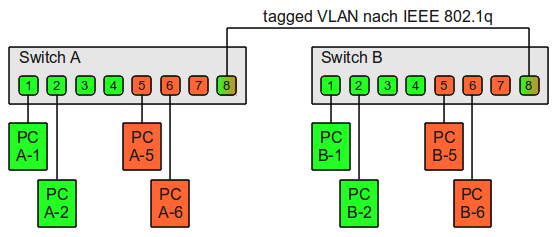
Erkläre den Begriff Trunk Port.
Bei tagged VLANs können mehrere VLANs über einen einzelnen Switch-Port genutzt werden. Die einzelnen Ethernet Frames bekommen dabei Tags angehängt, in dem jeweils die VLAN-ID vermerkt ist zu dessen VLAN das Frame gehört. Wenn im gezeigten Beispiel beide Switches tagged VLANs beherrschen, kann damit die gegenseitige Verbindung mit einem einzelnen Kabel erfolgen:
Verbindung der zwei VLANs der beiden physischen Switche über ein einzelnes Kabel. Auf diesem Kabel (Trunk) kommen VLAN tags zum Einsatz (IEEE 802.1q)
Ethernet interfaces can be configured either as access ports or a trunk ports, as follows:
Access and trunk interfaces
An access port can have only one VLAN configured on the interface; it can carry traffic for only one VLAN.
A trunk port can have two or more VLANs configured on the interface; it can carry traffic for several VLANs simultaneously.
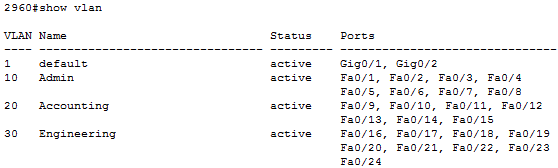
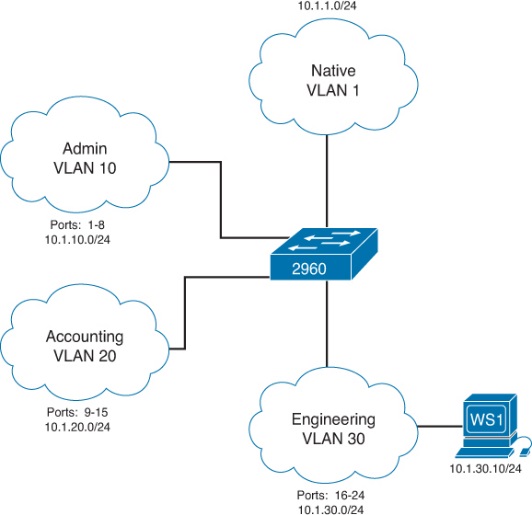
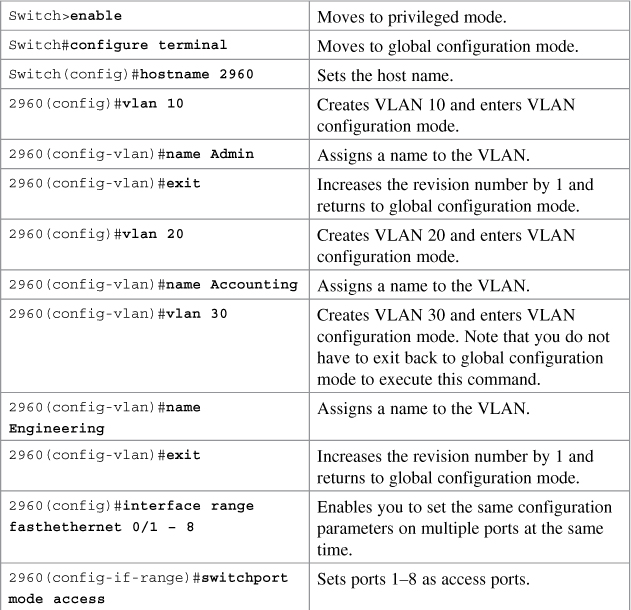
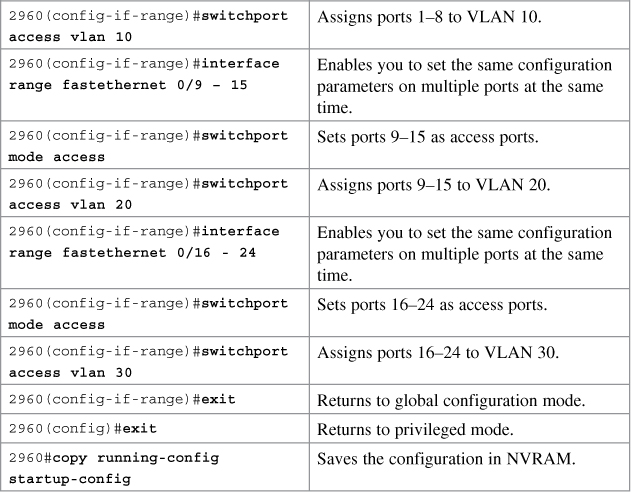
Baue in Packet Tracer ein Netz mit den VLANS 10, 20 und 30 auf. Gib den VLANS die angegebenen Namen. Alle Konfigurationsschritte sollen in der CLI erfolgen.
Erweitere dein Netz aus der vorigen Aufgabe um einen Router und konfiguriere Routing zwischen den VLANS. Es darf nur eine Schnittstelle auf dem Router benutzt werden. Alle Konfigurationsschritte sollen in der CLI erfolgen.
Router nicht an einen VLAN Port hängen, sondern an die GigaBit-Schnittstelle.
Konfiguration des Routers:
Router>en
Router#conf t
Router(config)#int fa0/0.1
Router(config-subif)#encapsulation dot1q 10
Router(config-subif)#ip address 10.1.10.1 255.255.255.0
Router(config-subif)#no shut
Router(config-subif)#int fa0/0.2
Router(config-subif)#encapsulation dot1q 20
Router(config-subif)#ip address 10.1.20.1 255.255.255.0
Router(config-subif)#no shut
Router(config-subif)#int fa0/0.3
Router(config-subif)#encapsulation dot1q 30
Router(config-subif)#ip address 10.1.30.1 255.255.255.0
Router(config-subif)#no shut
Router(config)#int fa0/0
Router(config-if)#no shut
Router(config-if)#do show ip route
10.0.0.0/24 is subnetted, 3 subnets
C 10.1.10.0 is directly connected, FastEthernet0/0.1
C 10.1.20.0 is directly connected, FastEthernet0/0.2
C 10.1.30.0 is directly connected, FastEthernet0/0.3
Konfiguration des Switchs:
2960>en
2960#conf t
2960(config)#int gi0/1
2960(config-if)#switchport mode trunk
2960(config-if)#exit
Konfiguration des PCs:
IP-Adresse: 10.1.10.10
Gateway: 10.1.10.1
Ersetze den Switch aus Aufgabe 5 durch einen L3-Switch und konfiguriere Routing zwischen den VLANS. Alle Konfigurationsschritte sollen in der CLI erfolgen.
Lege die VLANS gemäß Aufgabe 5 erneut an.
A L3-switch has routing capabilities! One can configure a SVI (Switch Virtual Interface) for each VLAN and put an IP address on it. This IP address can be used for computers as their default gateway. Here’s how to configure it:
Switch(config)#ip routing
Switch(config)#interface vlan 10
Switch(config-if)#ip address 10.1.10.1 255.255.255.0
Switch(config-if)#no shut
Switch(config-if)#interface vlan 20
Switch(config-if)#ip address 10.1.20.1 255.255.255.0
Switch(config-if)#no shut
Switch(config-if)#interface vlan 30
Switch(config-if)#ip address 10.1.30.1 255.255.255.0
Switch(config-if)#no shut
Enough about the SVI, there’s another method we can use our multilayer switch for routing. By default all interfaces on a switch are switchports (layer 2) but we can change them to routed ports (layer 3). A routed port is the exact same interface as what we use on a router.
Erstelle in Packet Tracer folgende Netzwerkkonfiguration. Alle Konfigurationsschritte sollen in der CLI erfolgen.
Switch>en
Switch#conf t
Switch(config)#hostname SWITCH_A
SWITCH_A(config)#vlan 10
SWITCH_A(config-vlan)#name VLAN_1
SWITCH_A(config-vlan)#vlan 20
SWITCH_A(config-vlan)#name VLAN_2
SWITCH_A(config-vlan)#vlan 30
SWITCH_A(config-vlan)#name VLAN_3
SWITCH_A(config-vlan)#exit
SWITCH_A(config)#int fa0/1
SWITCH_A(config-if)#switchport mode access
SWITCH_A(config-if)#switchport access vlan 10
SWITCH_A(config-if)#int fa0/2
SWITCH_A(config-if)#switchport mode access
SWITCH_A(config-if)#switchport access vlan 20
SWITCH_A(config-if)#int fa0/3
SWITCH_A(config-if)#switchport mode access
SWITCH_A(config-if)#switchport access vlan 30
SWITCH_A(config-if)#int gi0/1
SWITCH_A(config-if)#switchport mode trunk
SWITCH_A(config-if)#exit
SWITCH_A(config)#exit
SWITCH_A#copy run start
Analog dazu SWITCH_B konfigurieren.
PCs konfigurieren. Jedes VLAN sein eigenes IP-Netz.
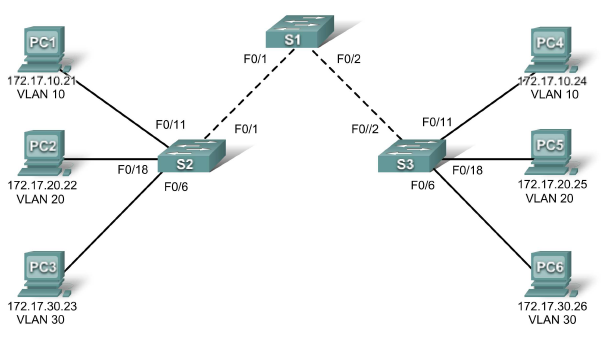
Erstelle in Packet Tracer folgende Netzwerkkonfiguration. Alle Konfigurationsschritte sollen in der CLI erfolgen.
Belegungen:
Für die Switches S2 und S3 gilt:
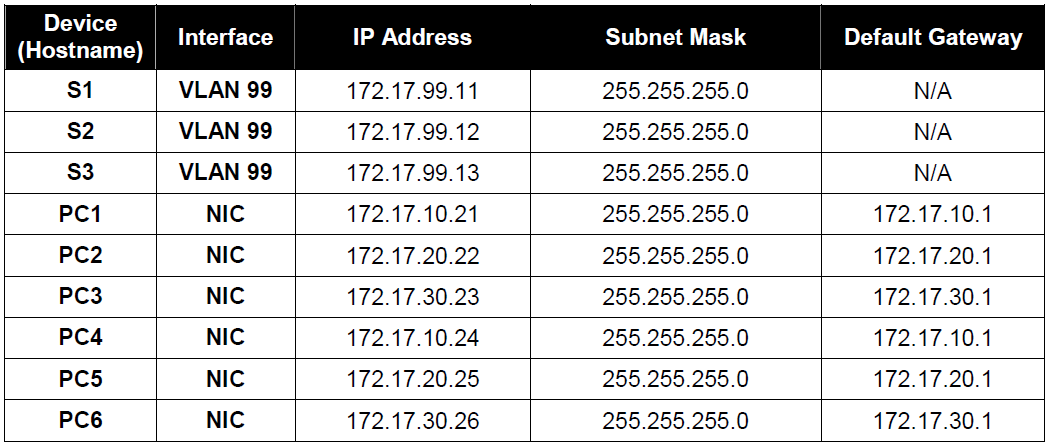
Create VLANs on switch S1.
S1(config)#vlan 10
S1(config-vlan)#name faculty/staff
S1(config-vlan)#vlan 20
S1(config-vlan)#name students
S1(config-vlan)#vlan 30
S1(config-vlan)#name guest
S1(config-vlan)#vlan 99
S1(config-vlan)#name management
S1(config-vlan)#end
S1#show vlan brief
Analog für S2 und S3
Assign switch ports to VLANs on S2 and S3.
Refer to the port assignment table on page 1. Ports are assigned to VLANs in interface configuration
mode, using the switchport access vlan vlan-id command. You can assign each port individually or you
can use the interface range command to simplify this task, as shown here. The commands are shown for
S3 only, but you should configure both S2 and S3 similarly. Save your configuration when done.
S3(config)#interface range fa0/6-10
S3(config-if-range)#switchport access vlan 30
S3(config-if-range)#interface range fa0/11-17
S3(config-if-range)#switchport access vlan 10
S3(config-if-range)#interface range fa0/18-24
S3(config-if-range)#switchport access vlan 20
S3(config-if-range)#end
S3#copy running-config startup-config
Assign the management VLAN.
A management VLAN is any VLAN that you configure to access the management capabilities of a switch.
VLAN 1 serves as the management VLAN if you did not specifically define another VLAN. You assign the
management VLAN an IP address and subnet mask. A switch can be managed via HTTP, Telnet, SSH,
or SNMP. Because the out-of-the-box configuration of a Cisco switch has VLAN 1 as the default VLAN,
VLAN 1 is a bad choice as the management VLAN. You do not want an arbitrary user who is connecting
to a switch to default to the management VLAN. Recall that you configured the management VLAN as
VLAN 99 earlier in this lab.
From interface configuration mode, use the ip address command to assign the management IP address
to the switches.
S1(config)#interface vlan 99
S1(config-if)#ip address 172.17.99.11 255.255.255.0
S1(config-if)#no shutdown
S2(config)#interface vlan 99
S2(config-if)#ip address 172.17.99.12 255.255.255.0
S2(config-if)#no shutdown
S3(config)#interface vlan 99
S3(config-if)#ip address 172.17.99.13 255.255.255.0
S3(config-if)#no shutdown
Configure trunking and the native VLAN for the trunking ports on all switches.
Trunks are connections between the switches that allow the switches to exchange information for all VLANS. By default, a trunk port belongs to all VLANs, as opposed to an access port, which can only belong to a single VLAN. If the switch supports both ISL and 802.1Q VLAN encapsulation, the trunks must specify which method is being used. Because the 2960 switch only supports 802.1Q trunking, it is not specified in this lab.
A native VLAN is assigned to an 802.1Q trunk port. In the topology, the native VLAN is VLAN 99. An 802.1Q trunk port supports traffic coming from many VLANs (tagged traffic) as well as traffic that does not come from a VLAN (untagged traffic). The 802.1Q trunk port places untagged traffic on the native VLAN.
Untagged traffic is generated by a computer attached to a switch port that is configured with the native VLAN. One of the IEEE 802.1Q specifications for Native VLANs is to maintain backward compatibility with untagged traffic common to legacy LAN scenarios. For the purposes of this lab, a native VLAN serves as a common identifier on opposing ends of a trunk link. It is a best practice to use a VLAN other than VLAN 1 as the native VLAN.
Use the interface range command in global configuration mode to simplify configuring trunking.
S1(config)#interface range fa0/1-5
S1(config-if-range)#switchport mode trunk
S1(config-if-range)#switchport trunk native vlan 99
S1(config-if-range)#no shutdown
S1(config-if-range)#end
S2(config)# interface range fa0/1-5
S2(config-if-range)#switchport mode trunk
S2(config-if-range)#switchport trunk native vlan 99
S2(config-if-range)#no shutdown
S2(config-if-range)#end
S3(config)# interface range fa0/1-5
S3(config-if-range)#switchport mode trunk
S3(config-if-range)#switchport trunk native vlan 99
S3(config-if-range)#no shutdown
S3(config-if-range)#end
Verify that the trunks have been configured with the show interface trunk command.
S1#show interface trunk
Schau dir zu Hause folgende Videos als Zusammenfassung über VLANs an:
https://www.youtube.com/watch?v=aBOzFa6ioLw
https://www.youtube.com/watch?v=-H20S65OB3E
https://www.youtube.com/watch?v=kbLfyjP20Yo
https://www.youtube.com/watch?v=8WHr0pLbTKs
https://www.youtube.com/watch?v=w6hfg4jQqDM
https://www.youtube.com/watch?v=ojh8_BDcXyI